Home Lab Series - Cuckoo Sandbox on ESXi

I’ve been very interested in Reverse Engineering and Malware Analysis but studying these areas can be tedious and sometimes overwhelming. To combat frustration and reduce the likelihood of giving up on a subject prematurely, I like to take a break with projects I consider an “easy win”. I like to choose projects that are challenging but completeable, and that result in something beneficial to my future studies. This is why I ended up setting up a Cuckoo Sandbox environment for my home lab.
Dynamic analysis is a major component of malware analysis and Cuckoo is one of the best automated malware analysis systems. My hope is to use Cuckoo to quickly analyze different malware samples and compare results of my manual analysis with that of the automated analysis. I am also curious about how Cuckoo can be used with SIEMs like elasticsearch and Splunk.
Getting Started
I started looking for guides on how to setup Cuckoo on ESXi and quickly learned there was not a lot of documentation out there. However, I found a few very helpful resources which I used to help complete the project. The two most helpful resources were “Alfaia com Linux” guide and the official Cuckoo docs.
- Alfaia com Linux - This was the most up-to-date and complete guide and a lot of the steps were taken directly from this resource.
- Cuckoo Docs - Official Cuckoo Docs for installation and configuration of the host and guest machines.
- Building a Cuckoo Sandbox on ESXi - Helpful resource for understanding the difference between the ESXi setup and typical setup with something like Virtual Box.
**Setting up Cuckoo on ESXi requires a licensed version with API functionality
My first step was to plan the network configuration. From Cuckoo Docs:
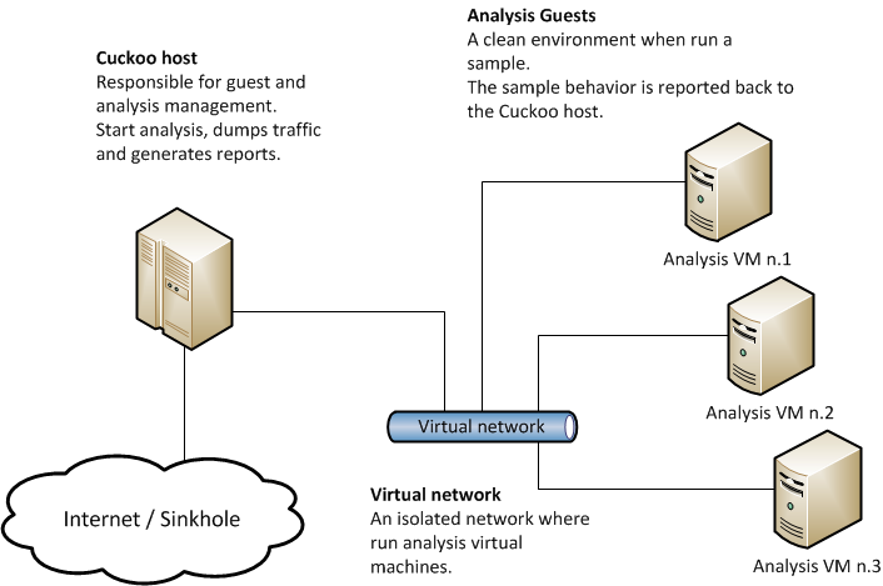
Cuckoo Sandbox consists of a central management software which handles sample execution and analysis.
Each analysis is launched in a fresh and isolated virtual or physical machine. The main components of Cuckoo’s infrastructure are an Host machine (the management software) and a number of Guest machines (virtual or physical machines for analysis).
The Host runs the core component of the sandbox that manages the whole analysis process, while the Guests are the isolated environments where the malware samples get actually safely executed and analyzed.
The following picture explains Cuckoo’s main architecture:

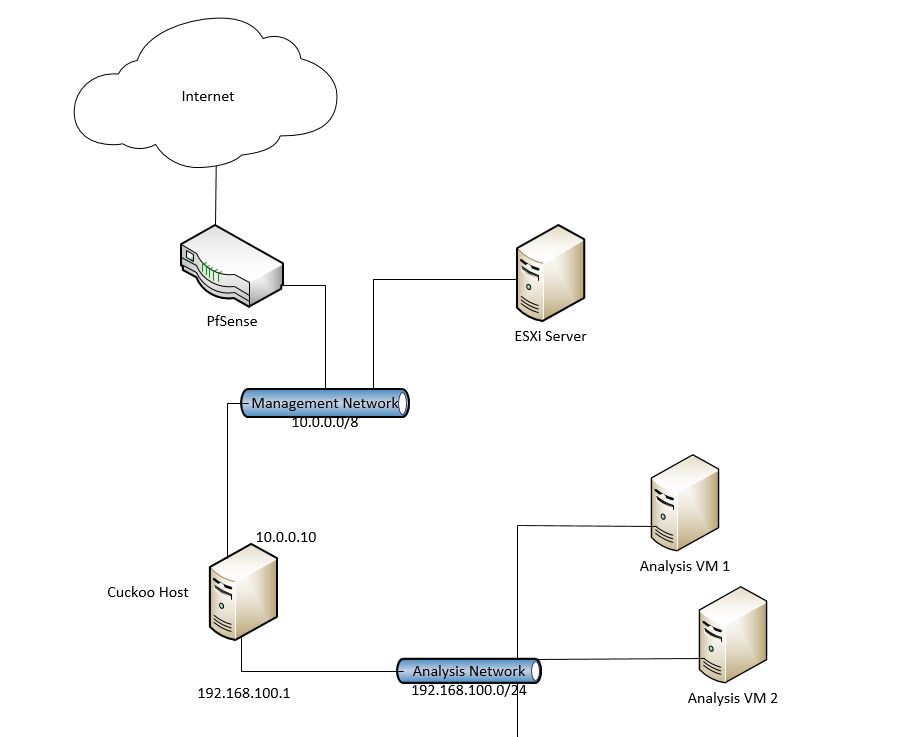
A key difference between the typical architecture and the achitecture when using ESXi is that the Cuckoo host cannot handle all of the guest managment tasks on its own. The Cuckoo host must be able to reach the ESXi Management API to control the guest machines. Since I wanted the guests to still have the ability to reach the internet without reaching the ESXi Management Network, I came up with the following Network Architecture plan.

Setting up Cuckoo Host VM
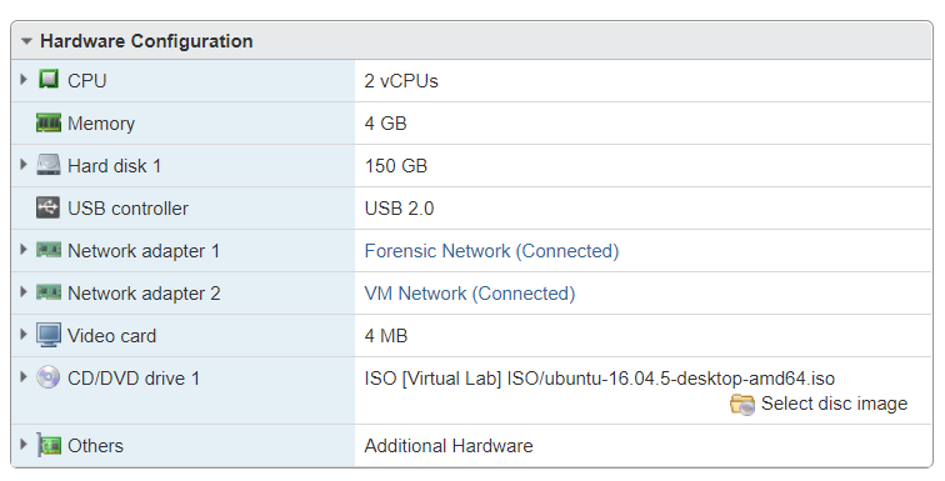
To start, I created a new Virtual Machine from an Ubunutu 16.04.5 Desktop image. The VM was connected to two seperate vSwitches, one connected to the ESXi Management Network, and the other to the Forensic/Analysis Network.

I ended up doubling the CPUs and Memory from the above screen shot - 4 vCPUs and 8GB Memory.
Next, I configured the Forensic/Analysis Network NIC and iptables wiht the folowing steps.
1. Set Static IP
Edit /etc/network/interfaces with following settings:
auto <analysis interface>
iface <analysis interface> inet static
address <analysis network gateway ip>
netmask <analysis network mask>
Example:
$ sudo vi /etc/network/interfaces

auto eth0
iface eth0 inet static
address 192.168.0.1
netmask 255.255.255.0
2. Configure NAT and Forwarding Rules
Implement to the following rules with iptables:
iptables -t nat -A POSTROUTING -o <management interface> -s <analysis network cidr> -j MASQUERADE
iptables -P FORWARD DROP
iptables -A FORWARD -d <mangement network cidr> -j DROP
iptables -A FORWARD -m state –state RELATED,ESTABLISHED -j ACCEPT
iptables -A FORWARD -s <analysis network cidr> -j ACCEPT
iptables -A FORWARD -s <analysis network cidr> -d <analysis network cidr> -j ACCEPT
iptables -A FORWARD -j log –log-prefix=’[cuckoo]’
Example:
$ sudo iptables -t nat -A POSTROUTING -o eth1 -s 192.168.100.0/24 -j MASQUERADE
$ sudo iptables -P FORWARD DROP
$ sudo iptables -A FORWARD -d 10.0.0.0/8 -j DROP
$ sudo iptables -A FORWARD -m state --state RELATED,ESTABLISHED -j ACCEPT
$ sudo iptables -A FORWARD -s 192.168.100.0/24 -j ACCEPT
$ sudo iptables -A FORWARD -s 192.168.100.0/24 -d 192.168.56.0/24 -j ACCEPT
$ sudo iptables -A FORWARD -j log --log-prefix='[cuckoo]'
The last rule allows us to filter the Forwarding logs with the following command:
$ sudo cat /var/log/kern.log | grep cuckooFinally, we need to save the current state of iptables for persistence. This requires the use of iptables-persistent:
$ iptables-save > /etc/iptables/rules.v4
3. Set Persistent IPv4 Forwarding in Kernel
Edit /etc/sysctl.conf by uncommenting the line containing “net.ipv4.ip_forward=1”
$ sudo vi /etc/sysctl.conf

# Uncomment the next line to enable packet forwarding for IPv4
net.ipv4.ip_forward=1
4. Installing Libraries
$ sudo apt-get install python python-pip python-dev libffi-dev libssl-dev
$ sudo apt-get install python-virtualenv python-setuptools
$ sudo apt-get install libjpeg-dev zlib1g-dev swig

$ sudo apt-get install mongodb
$ sudo apt-get install postgresql libpq-dev
5. Installing Libvirt Drivers
$ wget http://libvirt.org/sources/libvirt-1.3.1.tar.gz
$ tar –zxvf libvirt
$ cd libvirt
From Alfaia com Linux:
$ sudo apt-get install gcc make pkg-config libxml2-dev libgnutls-dev libdevmapper-dev libcurl4-gnutls-dev python-dev libpciaccess-dev libxen-dev libnl-dev uuid-dev xsltproc -yThe above command returned an error indicating libnl “has no installation candidate error”. To find the correct library, I used apt-cache.
$ sudo apt-cache linbnlFrom this I found the correct library “libnl-3-dev” and updated the command, then proceeded to install dependencies and configure libvirt (from libvirt directory).
$ sudo apt-get install gcc make pkg-config libxml2-dev libgnutls-dev libdevmapper-dev libcurl4-gnutls-dev python-dev libpciaccess-dev libxen-dev libnl-3-dev uuid-dev xsltproc -y

$ ./configure --prefix=/usr --localstatedir=/var --sysconfdir=/etc --with-esx=yes
I received an error about a missing library “libnl-route-3.0”. Using apt-cache discovered the correct name and finished installing.
$ sudo apt-get install libnl-route-3-dev

$ ./configure --prefix=/usr --localstatedir=/var --sysconfdir=/etc --with-esx=yes

$ make
$ sudo make install
$ sudo pip install llibvirt-python
Finally, I just needed to verify that everything installed correctly. The list command should output a lost of hosts running on the ESXi server. The Cuckoo host should be in this list.
$ virsh -v
$ virsh -c esx://<esxi ip>?no_verify=1
$ list
$ exit
Depending on the what you would like Cuckoo to do not all of the following steps may be necessary.
6. Installing Yara Docs
$ sudo apt-get install automake libtool make gcc

$ tar -zxf yara-3.7.0.tar.gz
$ cd yara-3.7.0
$ ./bootstrap.sh

$ sudo apt-get install libjansson-dev
$ ./configure --enable-cuckoo --with-crypto

$ make
$ sudo make install
$ make check
7. Installing PyDeep for Fuzzy Hashing
$ sudo apt-get install ssdeep libfuzzy-dev
$ sudo apt-get install git

$ git clone https://github.com/kbandla/pydeep.git
$ cd pydeep
$ sudo python setup.py install
8. Installing TCPDump
$ sudo apt-get install tcpdump apparmor-utils
$ sudo aa-disable /usr/sbin/tcpdump

$ sudo setcap cap_net_raw,cap_net_admin=eip /usr/sbin/tcpdump

$ tcpdump -i <interface>
9. Installing Volatility
$ git clone https://github.com/volatilityfoundation/volatility.git
$ cd volatility
$ sudo python setup.py install
9. Installing M2Crypto
$ sudo apt-get install swig
$ sudo pip install m2crypto==0.24.0
10. Installing Cuckoo
$ sudo pip install -U pip setuptools
$ sudo pip install -U cuckoo
Cuckoo should now be installed! The hard part is over! All that is left is to configure Cuckoo and setup the Guest machines.
Configuring Cuckoo
The Cuckoo configuration files are commented very well. Most settings can be configured just be reading the comments.
donald@comp:~$ sudo apt-get update